Automating Email Sending from Google Sheets with AWS SES
Published on October 27, 2023
Introduction
Automating email communication is a powerful way to streamline your workflow. By integrating Google Sheets with AWS Simple Email Service (SES), you can easily send personalized emails to a large audience based on data in your spreadsheets. In this tutorial, we'll guide you through the process of setting up this automation using CodelessAPI, enabling you to efficiently send emails from your Google Sheets without writing complex code.
Why CodelessAPI
CodelessAPI offers a user-friendly and cost-effective platform for such integrations. It's available on a free plan, making it accessible without upfront costs. With its intuitive visual interface, automation capabilities, and support for bulk emails, CodelessAPI provides more customization and flexibility compared to alternatives like Zapier and Make. This flexibility is especially valuable when you want to tailor your workflows to specific requirements, making it an ideal choice for large-scale email campaigns.
Prerequisites
- An AWS SES account: Before you get started, make sure you have an AWS SES account. If you don't already have one, you can follow the official AWS SES setup guide to create an account. Keep note of the region that you created your AWS SES account in. You'll also be able to see this in the top right hand side of your AWS dashboard. Clicking on the location will reveal the region code, i.e. "us-east-1".
- Access to Google Sheets: You'll need access to the Google Sheets document containing the data you want to send via email.
- A CodelessAPI.io account: You'll need an account on CodelessAPI.io, which offers a free plan for you to set up the integration.
Step 1: Create an IAM Role in AWS
To allow CodelessAPI to interact with AWS SES, you need to create an IAM (Identity and Access Management) role in your AWS account. IAM roles provide the necessary permissions for CodelessAPI to access AWS services securely. These roles ensure that your integration is both controlled and secure. You can follow the AWS IAM setup guide to create the role. Here are the steps to create an IAM role:
- Log in to your AWS Management Console.
- Navigate to the Identity and Access Management (IAM) console.
- Choose "Roles" from the left sidebar.
- Click the "Create role" button to begin creating a new role.
- For use cases, use "CodelessAPI" or an appropriate use case for your integration.
- Now, select "Permissions" for the role. Search for "AmazonSES_FullAccess" and attach this policy to your role. This policy grants CodelessAPI the necessary permissions to use AWS SES.
- Follow the on-screen instructions to complete the role creation. You'll be asked to name the role and add tags if needed.
Step 2: Generate Access Keys
Access Key ID and Secret Access Key are credentials that allow CodelessAPI to authenticate and interact with AWS SES securely. Access Keys act as the credentials that grant access to your AWS resources without exposing your AWS account's root user credentials. To generate Access Keys for your IAM role, follow these steps:
- Log in to your AWS Management Console.
- Navigate to the Identity and Access Management (IAM) console.
- Choose "Roles" from the left sidebar.
- Search for the role you created earlier (the one for CodelessAPI) and click on it.
- In the role details, navigate to the "Security credentials" tab.
- Click "Create access key" to generate new Access Keys.
- Once generated, you'll see the Access Key ID and Secret Access Key. Make sure to copy both and save them in a secure location. You'll need these keys to configure the AWS SES module in CodelessAPI.
Refer to the AWS IAM Access Key setup guide for mode detailed instructions.
Step 3: Set Up CodelessAPI Workflow
CodelessAPI provides a user-friendly and intuitive platform for setting up integrations. It offers a free plan that allows you to get started without any upfront costs. In this step, we'll create a new workflow in CodelessAPI to integrate Google Sheets and AWS SES.
- Access CodelessAPI: Log in to your CodelessAPI.io account.
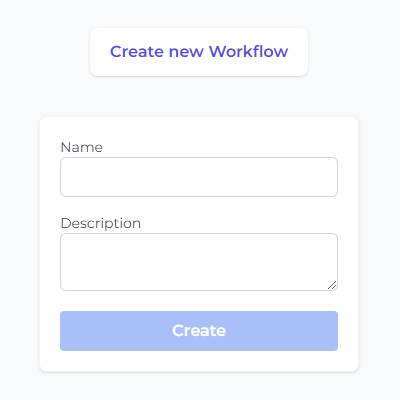
- Navigate to Workflow: Click on the "Create new Workflow" button in the Workflow section of your dashboard.
- Create your Workflow: Provide a name and description for your Workflow, and then click "Create". You'll be redirected to the Workflow builder page.
Step 4: Connect Google Sheets to CodelessAPI
Now, let's connect your Google Sheets data to CodelessAPI. This connection allows you to fetch data directly from your spreadsheet to personalize your emails.
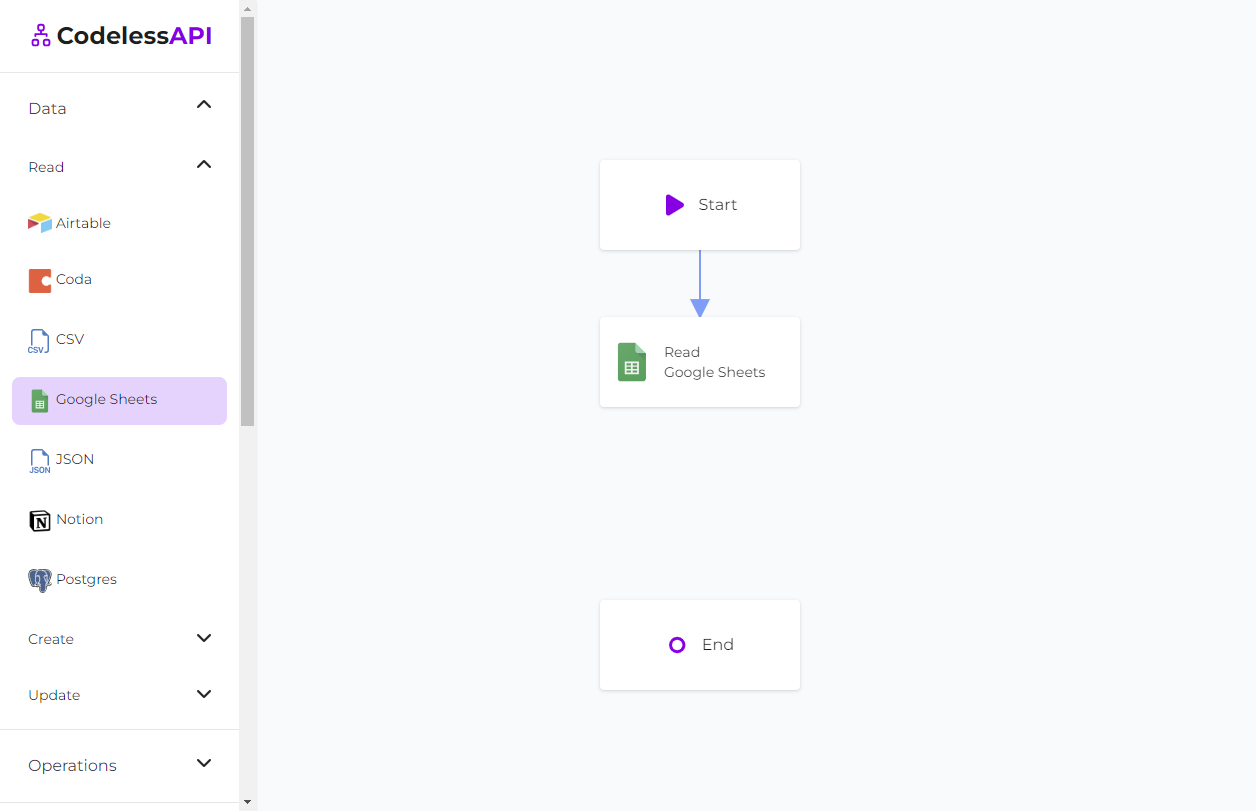
- Drag Google Sheets Module: In the left sidebar of your workflow builder, expand the "Data" section, then expand the "Read" section and find the Google Sheets module and drag it onto your canvas.
- Configure Google Sheets Module: Click on the Google Sheets module you've added to your canvas. This is where you'll set up the connection. Click on "New Google Sheets Account"
- Authenticate Your Google Sheets Account: Follow the authentication process to connect your Google Sheets account to CodelessAPI. Afterwards, click the "Add new Google Sheets" button within Codeless API and paste the Google Sheets link that contains the data you want to send via email with AWS SES. For more detailed integration steps, refer to the guide on how to query Google Sheets.
- Link the modules To dictate the flow of data, you need to link your modules together. Click the "Start" module and then click "Link". You should see a blue line with an arrow pointing towards your cursor. Move your cursor over to the "Google Sheets" module and click. You should now see an arrow going from the Start module to the Google Sheets module.
Step 5: Add the Text Replace Module
Use the "Text Replace" module if you'd like to send personalized emails or would like to use a custom template.
- Drag Test Replace Module: In the left sidebar of your workflow builder, expand the "Operations" section and find the "Text Replace" module and drag it onto your canvas.
- Link the modules Similar to above, link the "Google Sheets" module to the "Text Replace" module.
- Configure the Text Replace Module: Click on the Text Replace module you've added to your canvas. Within the "Text body" field is where you can paste your html template or your personalized message.
- Replace words for customizability Use the "Add new replace condition" option to replace words from your body text. By setting the "Replace with" to the "map" option. You can select a field from the Google Sheets data source. Make sure to click on the "Add replace condition" button after you've added yoru condition!
For example, the body text "Hi [NAME]" can have the "[NAME]" replaced with data from the Google Sheets source. Each row in the data source will generate a new personalized template with all the words replaced based on the "Text Replace" modules configurations.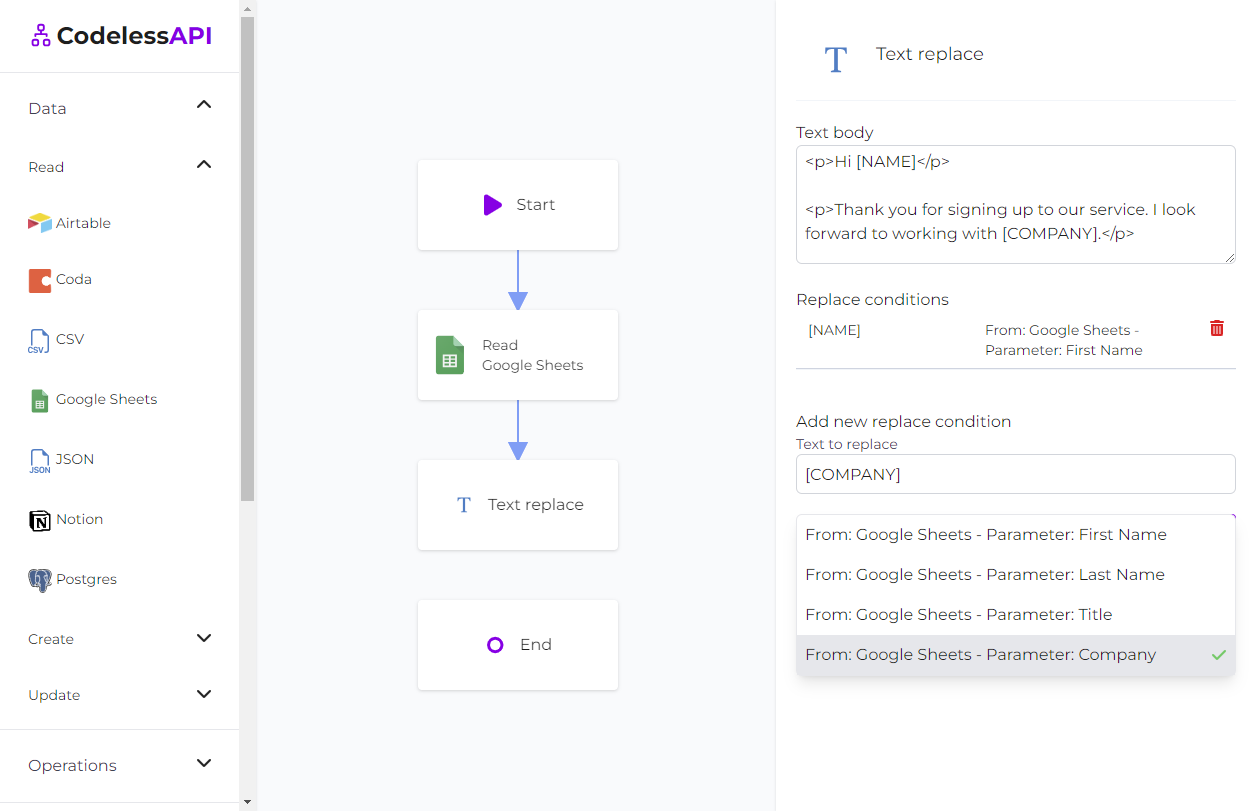
You've now added the ability to generate personalized templates! Link the "Text Replace" module to the "End" module and click run to see the output templates. Optionally add the "ChatGPT" module to before the "Text Replace" module, and then feed in both Google Sheets and the "ChatGPT" module to automate generating personalized emails!
Step 6: Adding the AWS SES Module
Now that you've set up your data source, it's time to add the AWS SES module to your workflow. The AWS SES module will enable you to send emails efficiently and effectively. Follow these steps to add it to your canvas:
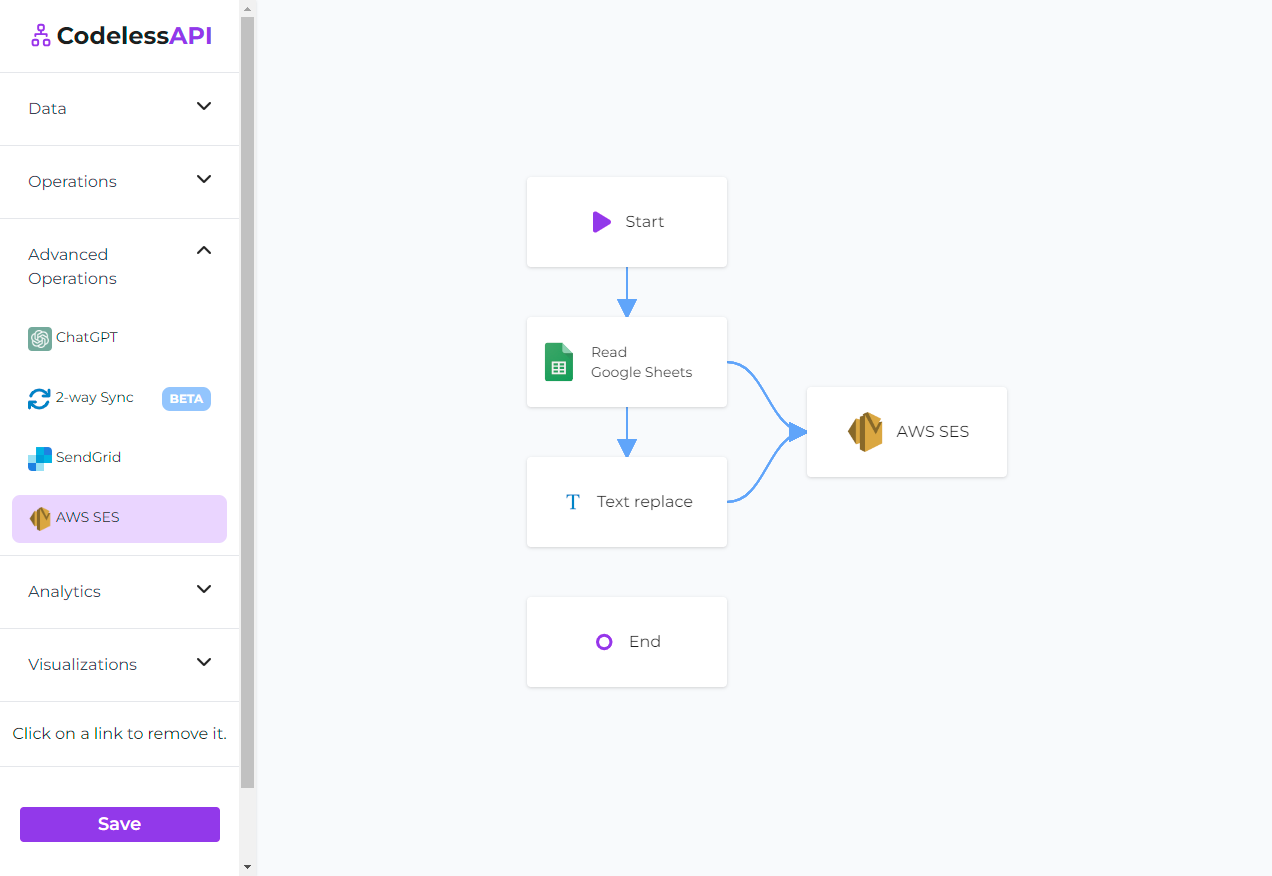
- Access Advanced Operations: In the left sidebar of the workflow builder, find the "Advanced Operations" section and expand it.
- Select AWS SES: Among the advanced options, locate the "AWS SES" module and drag it onto your canvas.
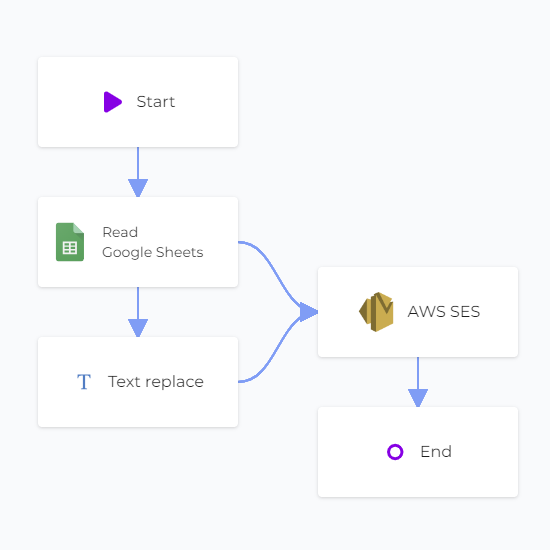
- Link the modules Similar to above, this time link both the "Google Sheets" module and the "Text Replace" module to the "AWS SES" module.
With the AWS SES module added, you're ready to configure it to connect securely to your AWS SES account.
Step 7: Configuring AWS SES Module
The AWS SES module is now on your canvas, and you'll need to configure it to connect to your AWS SES account securely. To configure the AWS SES module, follow these steps:
- Add AWS SES Account Click on the AWS SES module on the canvas, and then select "Configure" from the options. In the configuration panel, click on "New AWS SES Account" and paste your Access Key ID and Secret Access Key and add your AWS SES region. Provide a name and description for the account.
- Set email values You'll now be able to configure the email settings by clicking on your newly created AWS SES account and filling out the necessary details. These details include the sender's email, recipient's email, email subject, and email content. You can either set these fields manually or use a "map" option to automate the process.
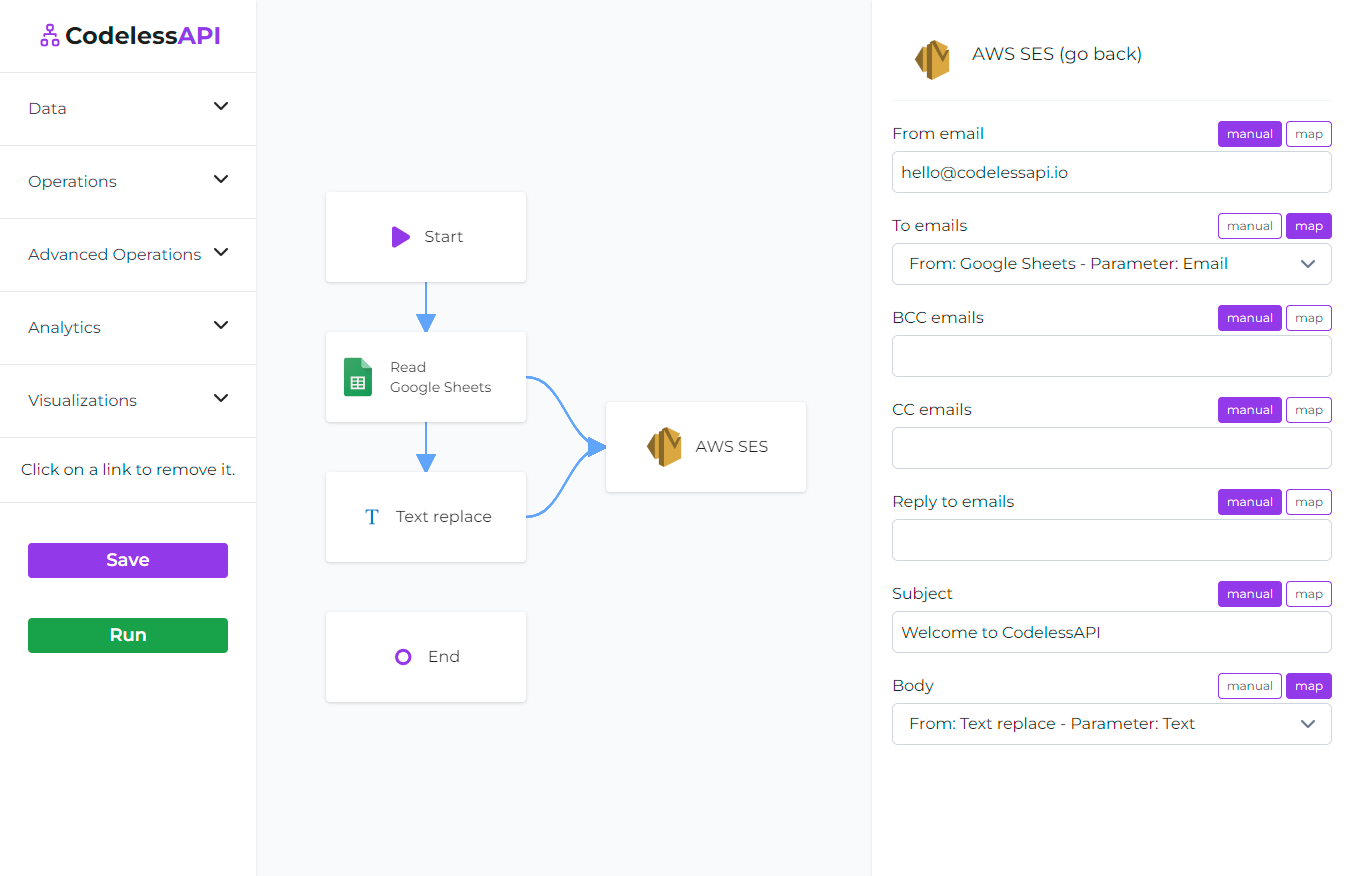
The "From email" option refers to the email address from which your AWS account will send emails. Ensure that these email addresses are verified in your AWS SES account. You can verify individual email addresses (e.g., "hello@codelessapi.io") or domain identities (e.g., "codelessapi.io"). Verifying domain identities allows you to send emails from any email address under that domain. You can follow the official AWS SES documentation for more details on email verification.
All the fields, including sender and recipient emails, subject, and content, can be set manually or mapped to data from your Google Sheets module. Mapping fields is useful when you want to send mass emails. You can connect a data source to your AWS SES module and select specific fields from your data source. For example, if your Google Sheets contains a list of leads with an "Email" column, you can map the recipient email field to this column. This way, you can send emails to multiple recipients based on your data source. CodelessAPI makes it easy to automate the process, saving you time and effort.
- Link the modules You can now link the "AWS SES" module to the "End" module. This completes you workflow and ensures that it operates seamlessly.
Step 8: Testing and Running the Workflow
Before you finalize your email automation, it's crucial to test your workflow and ensure that emails are sent correctly. Here's how you can run the workflow for validation:
- Use Built-in Run Feature: CodelessAPI.io offers a built-in run feature to validate your API endpoint. Click the "Run" button located at the bottom of the left sidebar to test your workflow.
- Inspect Results: Review the results of your test run. Ensure that emails are being sent correctly and that the data flows as expected.
- Copy API Link: Once you're satisfied with the results, you can either run your workflow manually or copy the API associated with your workflow to trigger it based on an event. Find your Workflow API by clicking on the "Start" module and selecting the "Configuration" option. Copy the provided API link.
Conclusion
Congratulations! You've successfully connected Google Sheets with AWS SES using CodelessAPI and automated email sending. This powerful combination, along with source modules, allows you to send personalized emails at scale without the need for complex coding.
By automating email sending from Google Sheets, you can streamline your email communication and reach your audience seamlessly. This integration can be particularly valuable for various use cases, including sending newsletters, notifications, personalized messages, and more.
Should you encounter any challenges or have questions during the setup or usage of this integration, don't hesitate to reach out to our support team at hello@codelessapi.io. We're here to assist you in optimizing your email workflows and ensuring that you make the most of this integration.
With the power of CodelessAPI, AWS SES, and Google Sheets integration, you can empower your product with automated, personalized emails. Happy emailing!