Syncing Google Sheets and Coda with CodelessAPI
Published on January 5, 2024
Introduction
Efficient data management often involves syncing data across different platforms. CodelessAPI provides a simple yet powerful solution to sync Google Sheets data to Coda without the need for intricate coding. This guide will walk you through the step-by-step process of using CodelessAPI. We'll focus specifically on the Smart Sync module to establish dynamic data sync between Google Sheets and Coda, enhancing your data workflow.
Smart Sync: A Versatile Data Synchronization Module
The Smart Sync module by CodelessAPI is designed to streamline the data synchronization process between any two data sources. In this blog post, we're going to be focusing on Google Sheets and Coda. You'll need to connect two read modules, configure column mappings, set update conditions, and define row equality checks. Let's dive into the key steps to sync your data seamlessly.
Setting Up Google Sheets as the Source
Follow these steps to configure Google Sheets as your data source in CodelessAPI:
Setting Up Coda as the Destination
Now, let's configure Coda as the destination for your synchronized data in CodelessAPI:
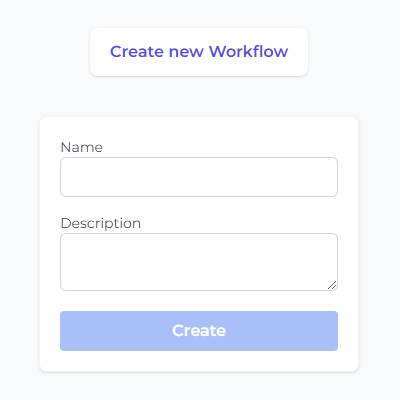
Step 1: Sign Up and Create a New API
- Create a CodelessAPI account: If you don't have an account, start by signing up for a free CodelessAPI account. You can register by visiting the sign-up page.
- Generate a new API: After logging in, go to your dashboard and navigate to the "Workflows" page. Click the "Create new Workflow" button. Provide a descriptive name and relevant description for your API. Upon creation, you'll be taken to the API builder interface.
Step 2: Connect Google Sheets
- Select Google Sheets as the data source: In the "Data" section of the left sidebar, expand the "Read" options, and choose "Google Sheets" as one of the data sources for your synchronization.
- Add the Google Sheets module to the canvas: Drag and drop the "Google Sheets" module onto the canvas. This module will be your starting point for reading data from Google Sheets.
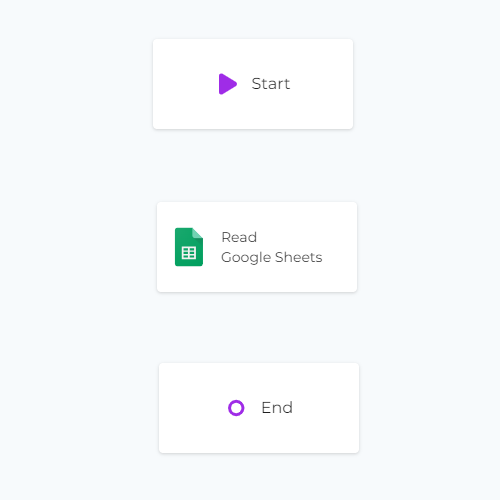
Step 3: Configure the Google Sheets Data Source
- Authorize CodelessAPI with Google Sheets: Click on the Google Sheets module within the canvas and select "Configure". Follow the prompts to authorize CodelessAPI and grant access to your Google Sheets data.
- Select the spreadsheet and sheet: After authorization, choose the specific Google Sheets spreadsheet and sheet that you want to sync data with. Select the columns you wish to include in the synchronization process.
Step 4: Connect Coda
- Select Coda as the data source: Access the "Data" section in the left sidebar of the API builder. Expand the "Read" options and choose "Coda" as the source for your synchronization process.
- Add the Coda module to the canvas: Drag and drop the "Coda" module onto the canvas. This module will be where the synchronized data will be inserted into.
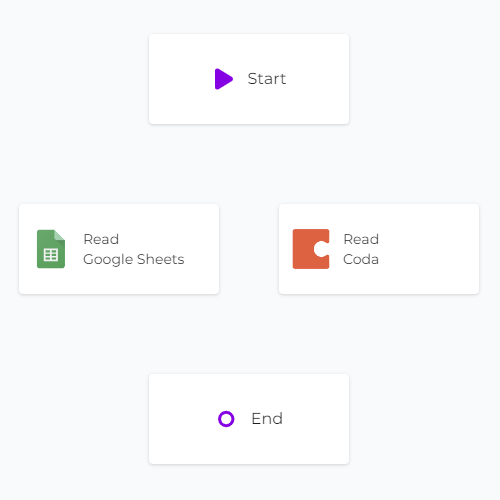
Step 5: Configure the Coda Data Source
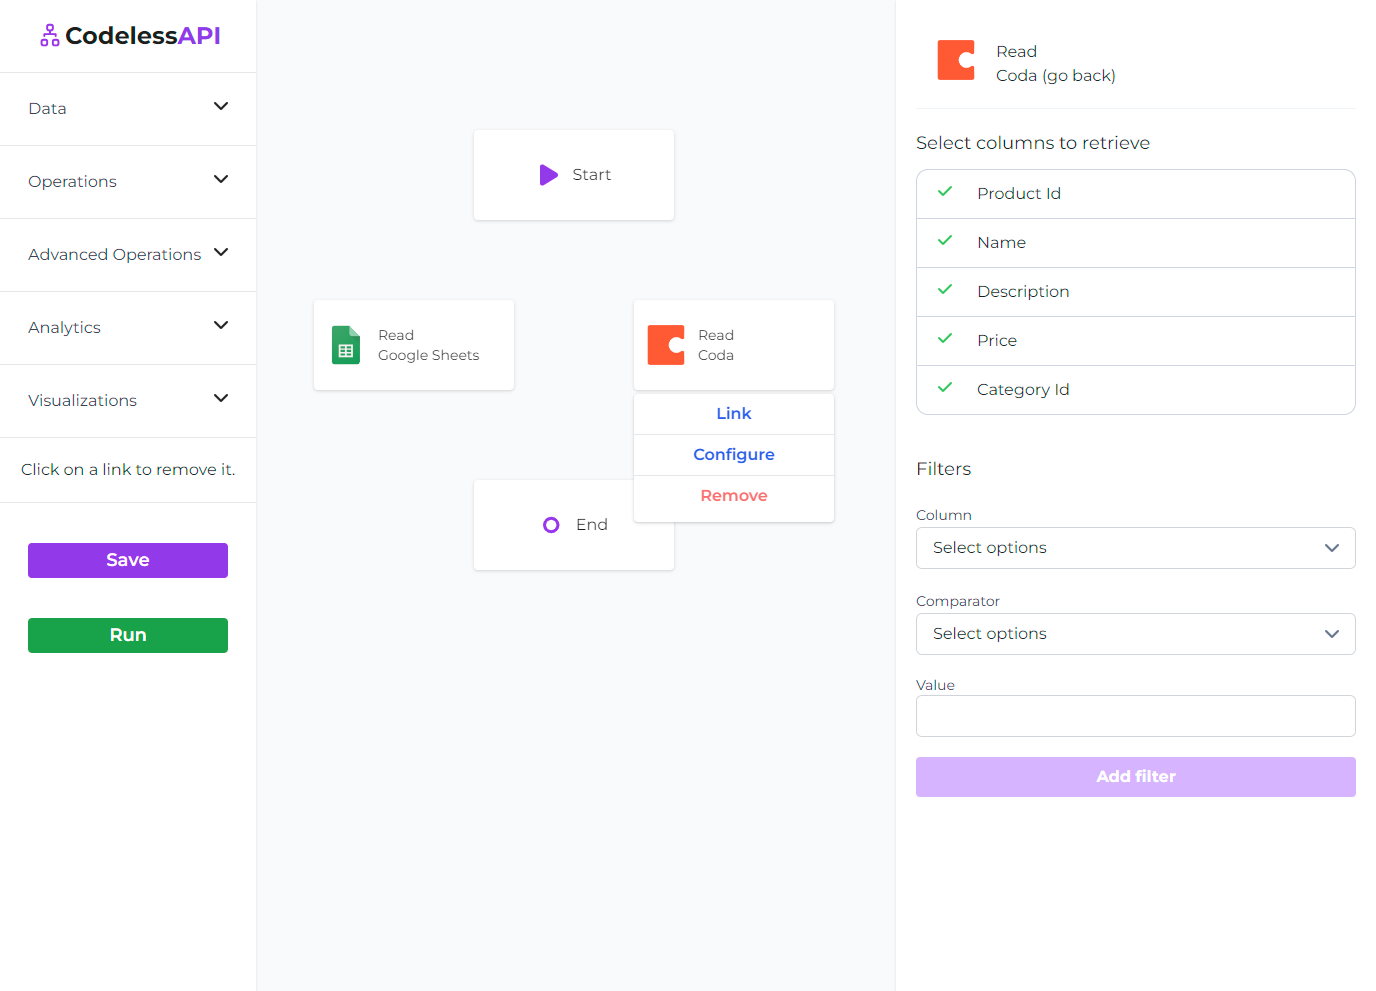
- Authorize CodelessAPI.io with Coda: Click on the Coda module on the canvas and select "Configure" from the options. In the configuration panel, click on the "New Coda Account" button and paste your Coda API token. Optionally, provide a name and description for the account. For integration steps on how to obtain your Coda token, please refer to the guide on how to query Coda.
- Select the Coda table: After authorization, pick the specific Coda table from your workspace that you intend to sync data from. Choose the columns you want to include in the synchronization process.
Step 6: Add the Smart Sync Module
- Add Smart Sync module: Expand the " Operations" section, and drag and drop the "Smart Sync" module onto the canvas. This module will act as the intermediary for syncing data between Google Sheets and Coda.
Step 7: Link the Modules
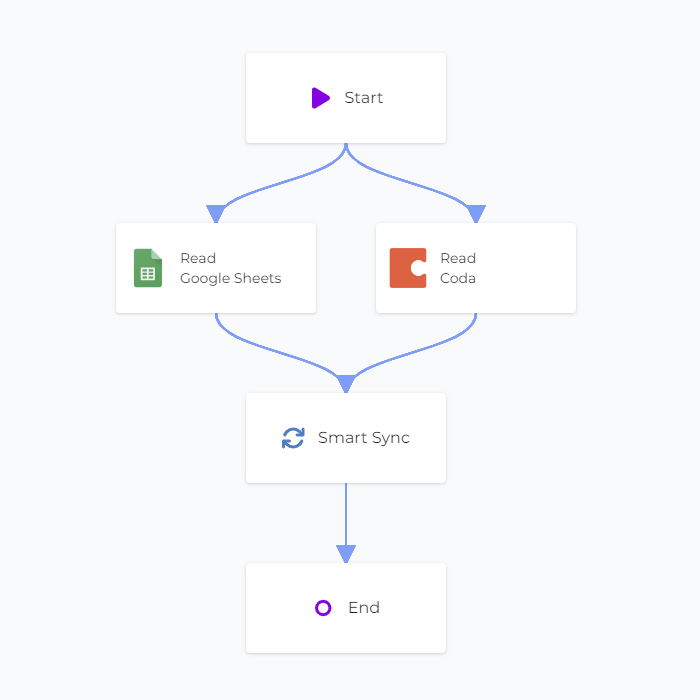
Create a data flow between Google Sheets, Coda, and the Smart Sync module:
- Link Start to Google Sheets: Connect the "Start" module to the "Google Sheets" module by clicking the "Start" module, clicking "Link" then clicking the "Google Sheets" module. You can remove a link by clicking on the link itself.
- Link Start to Coda: Similar to above, connect the "Start" module to the "Coda" module.
- Link Google Sheets to Smart Sync: Connect the "Google Sheets" module to the "Smart Sync" module.
- Link Coda to Smart Sync: Connect the "Coda" module to the "Smart Sync" module.
- Link Smart Sync to End: Connect the "Smart Sync" module to the "End" module.
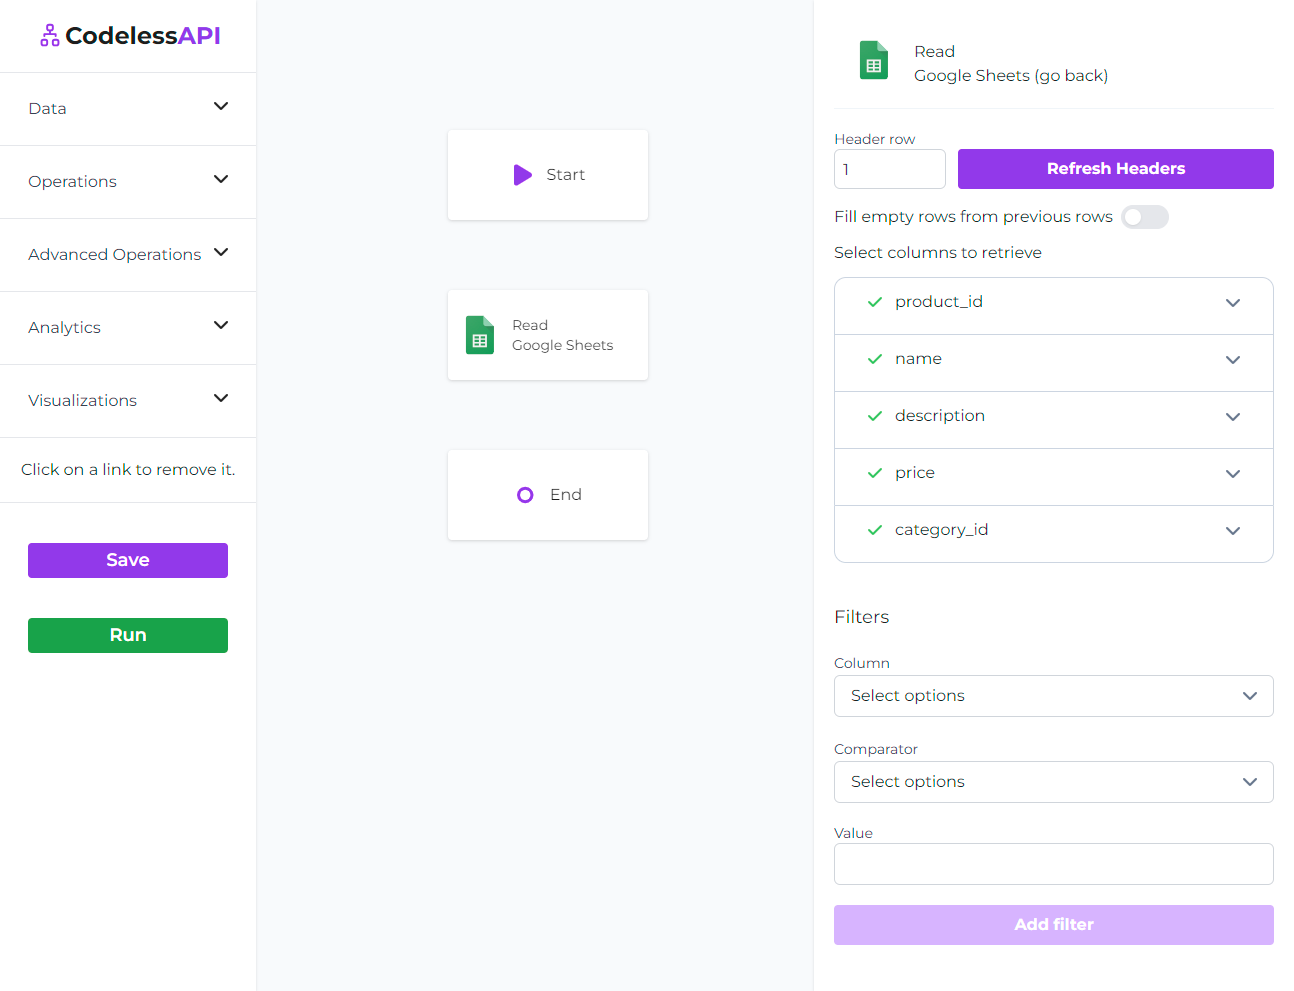
Step 8: Configure the Smart Sync Module
Configure the Smart Sync module to define how data should be synchronized between Google Sheets and Coda. Follow these detailed steps to set up your Smart Sync:
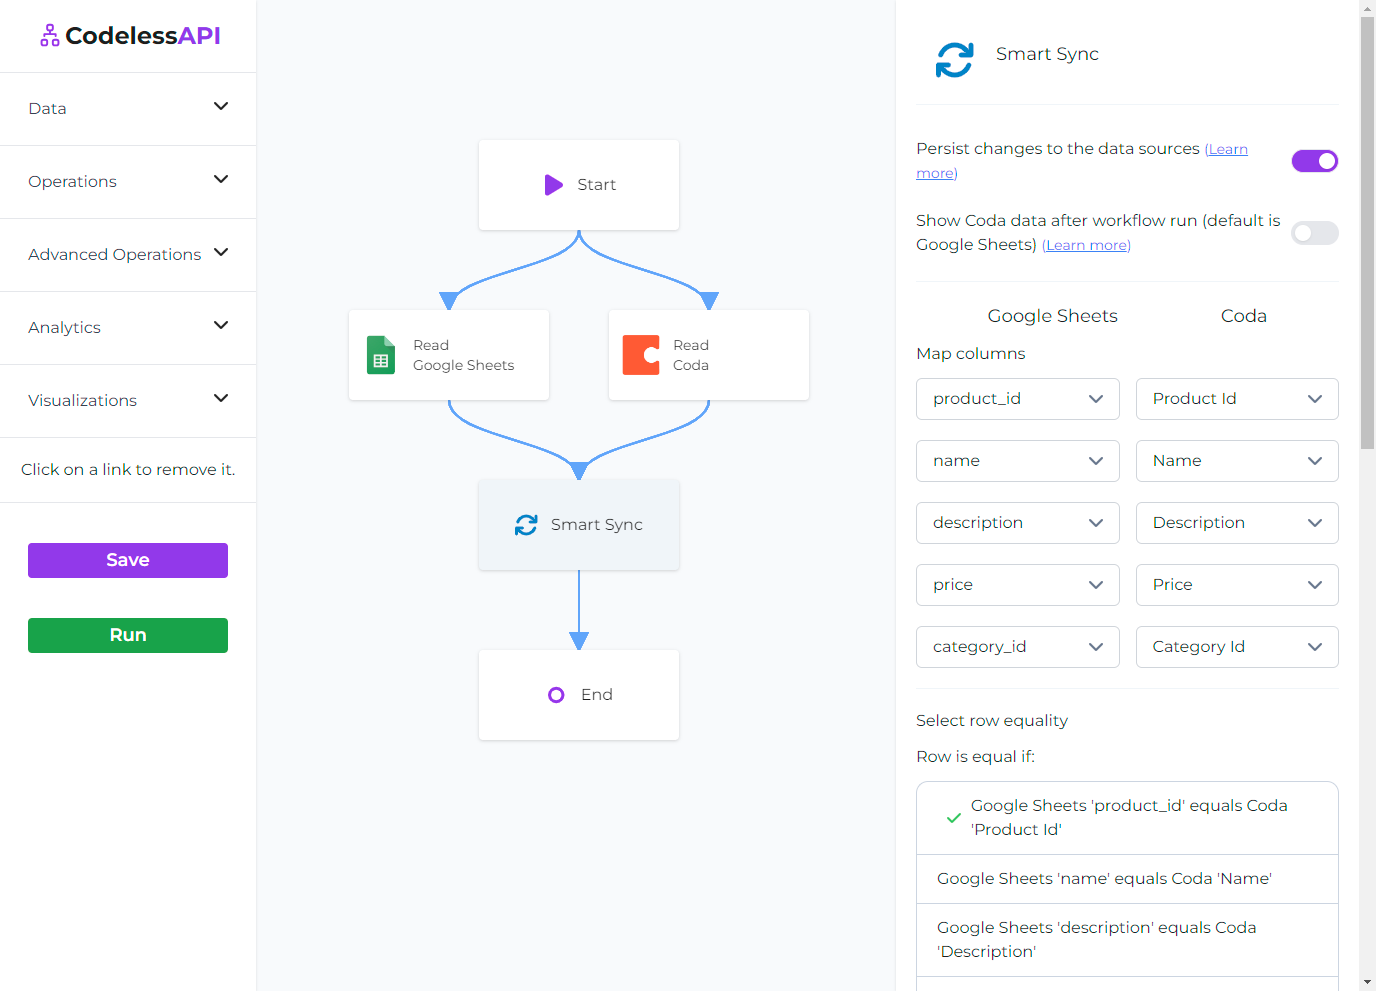
- Persist toggle: In the configuration panel, on the top, you will see an option to persist changes to the data sources. If this is toggled off, then the workflow will return the output of the smart sync without persisting any of the changes to the data sources. This lets you test out your configuration before making any changes to your sources. Keep this off while testing and ensure you're satisfied with the output before persisting your changes.
- Workflow Output toggle: After the workflow runs your sync, it displays the output of one of the data sources. The second toggle lets you choose which output you'd like to see. If you're syncing data between Google Sheets and Coda, you might decide to add rows from Google Sheets to Coda but not from Coda to Google Sheets. Hence the output for each data source will be different. If you'd like to see the output of a specific workflow when running the Smart Sync, this toggle will let you select that.
- Mapping columns: Now map your columns between Google Sheets and Coda. Here you can tell CodelessAPI which columns in Google Sheets will match to which columns in Coda.
- Row equality: Select the necessary conditions to determine whether or not a row in Google Sheets and Coda is equal.
- Update conditions: Select your update conditions. You can mix and match your update conditions as well, so some columns from Google Sheets will be updated to match the Coda column values, whereas other columns might be updated in Coda to match the Google Sheets column values.
- Create/Delete rows: Here you can specify whether to create or delete rows if a row exists in one data source but not the other.
Step 9: Test and Deploy Your API
- Test your API: Initiate a test run of the API using the "Run" button. This helps identify potential issues and validates the API endpoint's functionality.
- Deploy and use your API: After configuring the API, access the generated API endpoint to start the synchronization process between Google Sheets and Coda. To use the API, click on the "Start" module and select "Configuration" to obtain the API link. Remember to toggle the "Persist changes to the data sources" to allow changes to be made to your data sources.
Conclusion
CodelessAPI simplifies the process of syncing Google Sheets data to Coda, making it accessible and organized. Its user-friendly interface and integration capabilities enhance your data management workflow across different platforms. Whether you're handling spreadsheets, forms, or reports, CodelessAPI streamlines your data synchronization tasks.
Start optimizing your data synchronization process today by exploring the features of CodelessAPI. For any questions or feedback, don't hesitate to reach out to hello@codelessapi.io. Our team is dedicated to assisting you in streamlining your data management activities.
 Copy data from Coda to Google Sheets
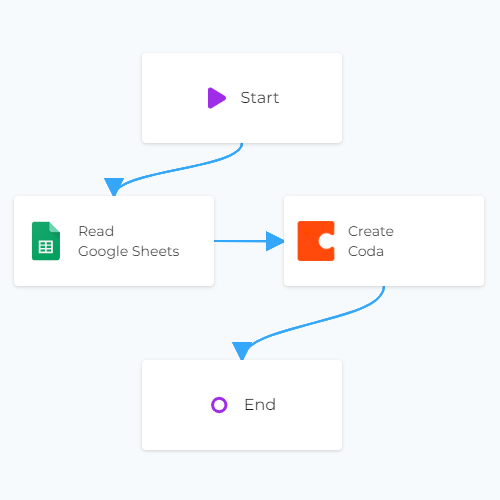 Copy data from Google Sheets to Coda
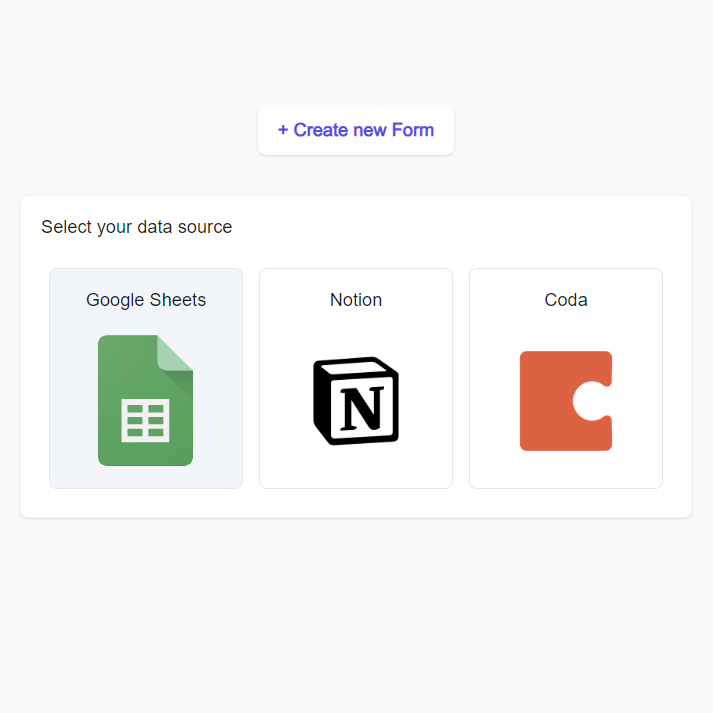 Google Sheets Forms