Discover Quick APIs: Effortless Data Integration and Management
Published on July 20, 2023
Introducing Quick APIs from CodelessAPI.io—an innovative solution designed to streamline your workflow and automate data management. Whether you're dealing with Google Sheets, Airtable, Coda, or any other supported data source, Quick APIs empower you to create, manage, and optimize APIs with ease.
Getting Started
Connecting your data source and creating Quick APIs is a breeze:
- Connect Your Data Source: Sign in to your CodelessAPI.io account and link your preferred data source. It could be Google Sheets, Airtable, Coda, or any other integrated platform.
- Generate Quick APIs: Once connected, choose the specific data you want to work with. Quick APIs will then generate a unique API endpoint tailored to your selection.
- CRUD Operations Made Easy: With your Quick API endpoint in hand, you can perform Create, Read, Update, and Delete operations seamlessly. No need for extensive coding or complex configurations.
Supported Operations
Quick APIs enable you to perform a range of operations on your data source:
- GET Calls: Retrieve data with GET requests to the generated API endpoint.
- POST Calls: Insert data with POST requests, including the ability to insert multiple rows at once.
- DELETE Calls: Delete rows using DELETE requests, with query parameters to specify which rows to delete.
- PUT/PATCH Calls: Update data using PUT or PATCH requests, and utilize query parameters to target specific rows.
Authorization Header
If you have configured your API to require authentication, all requests will need to include an Authorization header. This header is crucial for secure communication with your Quick API endpoints.
Here$apos;s how you construct and include the Authorization header in your requests:
- Construct Credentials: Combine your username and password with a colon (e.g.,
username:password). For example, if your username isuser123and your password ispass123, you would combine them asuser123:pass123. - Base64 Encoding: Encode the combined string using Base64. In the example above, the resulting Base64 encoded string would be
dXNlcjEyMzpwYXNzMTIz. - Include in Header: Include the encoded string in the Authorization header of your request. The header format should be:
Authorization: Basic [Base64 encoded string]
Using our example, it would be:Authorization: Basic dXNlcjEyMzpwYXNzMTIz
By following this process, you ensure secure communication with your Quick API endpoints, protecting your data and maintaining the integrity of your operations.
Customize Your Workflow
Tailor Quick APIs to your needs by customizing allowed methods:
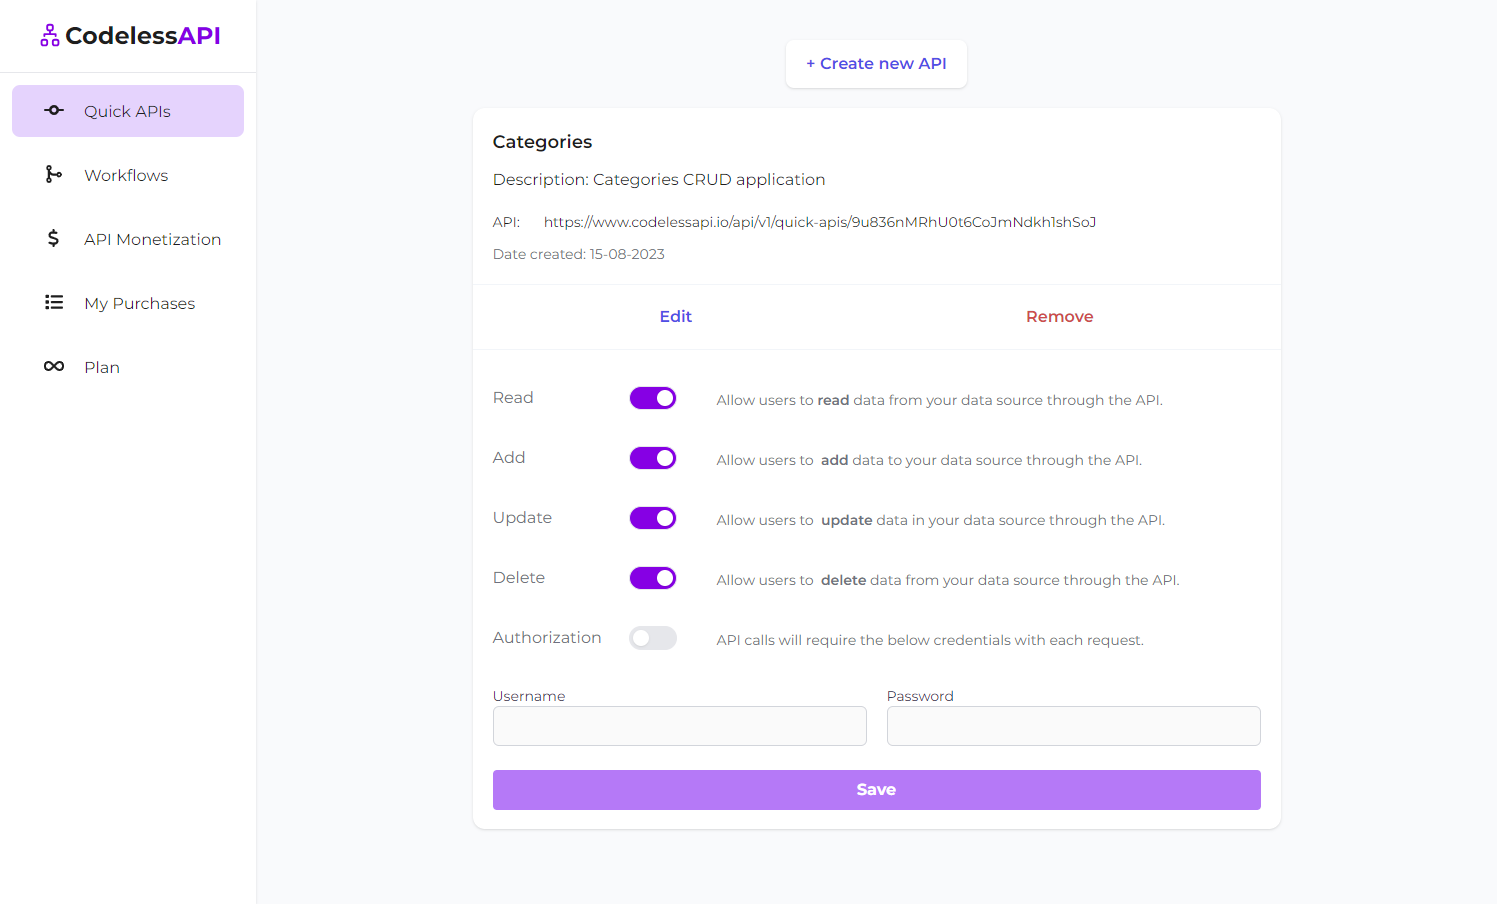
- Access Settings: Navigate to the Quick APIs dashboard page.
- Method Control: Choose which API methods you want to enable or disable by clicking the "Edit" button on the API. Toggle Read, Add, Update, or Delete methods based on your requirements. You can also configure authorization settings for your API in the drop down as well as set the authorized username and password.
- Save Changes: Click "Save", and your chosen settings will be applied instantly.
Implementation Examples
Copy your Quick API's URL and use it to replace the <YOUR_URL> in the code snippets below.
Implement Quick APIs with the language of your choice:
JavaScript Example
// Optional Authorization Token
const username = <USERNAME>;
const password = <PASSWORD>;
const credentials =  `${username}:${password}`;
const authToken = Buffer.from(credentials).toString("base64");

// You don't need to include the header field in your requests if authorization is disabled.

// GET Request
fetch("<YOUR_URL>", {
  headers: {
    Authorization: `Basic ${authToken}`,
  }
})
  .then(response => response.json())
  .then(data => console.log(data));

// POST Request
fetch("<YOUR_URL>", {
  method: "POST",
  headers: {
    "Content-Type": "application/json",
    Authorization: `Basic ${authToken}`,
  },
  body: JSON.stringify([
    { id: 1, name: "Jane", age: 29, company: "XYZ", location: "Canada" },
    { id: 2, name: "John", age: 30, company: "ABC", location: "USA" },
    { id: 3, name: "Joe", age: 31, company: "XYZ", location: "UK" },
  ])
})
  .then(response => response.json())
  .then(data => console.log(data));

// DELETE Request
fetch("<YOUR_URL>?age>=30&location=UK", {
  method: "DELETE"
})
  .then(response => response.json())
  .then(data => console.log(data));

// PUT Request
fetch("<YOUR_URL>?age>30&company=ABC", {
  method: "PUT",
  headers: {
    "Content-Type": "application/json",
    Authorization: `Basic ${authToken}`,
  },
  body: JSON.stringify({
    location: "USA"
  })
})
  .then(response => response.json())
  .then(data => console.log(data));
Conclusion
Quick APIs from CodelessAPI.io revolutionize data integration and management. Automate CRUD operations, connect with various data sources, and customize your workflow effortlessly. Whether you're a developer, business analyst, or non-technical user, Quick APIs are your solution for seamless data management.
Dive into the world of Quick APIs and experience the efficiency of automated data handling. For any inquiries or feedback, feel free to reach out to hello@codelessapi.io. Our team is dedicated to enhancing your data management processes.