Connecting and Using AWS SES
Published on October 24, 2023
Introduction
AWS Simple Email Service (SES) is a reliable email delivery service that allows you to send emails efficiently and effectively. Integrating AWS SES into your product can enhance your communication capabilities and enable you to reach your users seamlessly.
In this blog post, we will walk you through the process of connecting and using AWS SES with CodelessAPI. Whether you want to send transactional emails, marketing campaigns, or notifications, AWS SES has got you covered.
Why Use AWS SES in Your Product?
AWS SES offers several advantages for email communication in your product:
- High deliverability rates for your emails.
- Scalable infrastructure to handle email volume.
- Detailed analytics to track email performance.
- Easy-to-use APIs for seamless integration.
- No need to warm up IPs if you use the default, shared IP services.
Why CodelessAPI?
CodelessAPI offers a user-friendly and powerful platform to integrate services like AWS SES into your product workflows. Here are some reasons to choose CodelessAPI:
- CodelessAPI is available on a free plan, allowing you to get started without upfront costs.
- It provides an intuitive visual interface for creating complex workflows without coding.
- With CodelessAPI, you can automate processes efficiently, such as email delivery with AWS SES.
- CodelessAPI offers a wide range of integrations and modules to meet your specific needs.
- It's a flexible and cost-effective solution when compared to competitors like Zapier and Make.
- CodelessAPI allows for more customization, enabling you to tailor your workflows to specific requirements.
- It easily supports bulk emails, making it a suitable choice for large-scale email campaigns.
Getting Started with AWS SES Integration
Here's a step-by-step guide to connecting and using AWS SES in your product:
Step 1: Sign Up for AWS SES
Before you can integrate AWS SES with CodelessAPI, you need to create an AWS SES account. If you haven't already, follow the tutorial here to set up your AWS SES account. Keep note of the region that you created your AWS SES account in. You'll also be able to see this in the top right hand side of your AWS dashboard. Clicking on the location will reveal the region code, i.e. "us-east-1".
Step 2: Create an IAM Role
Now create an IAM (Identity and Access Management) role in your AWS account. The IAM role will provide the necessary permissions for CodelessAPI to interact with AWS SES. You can follow this tutorial to create an IAM role.
- Log in to your AWS Management Console.
- Navigate to the Identity and Access Management (IAM) console.
- Choose "Roles" from the left sidebar.
- Click the "Create role" button to begin creating a new role.
- For use cases, select "CodelessAPI" or an appropriate use case for your integration.
- Now, select "Permissions" for the role. Search for "AmazonSES_FullAccess" and attach this policy to your role. This policy grants CodelessAPI the necessary permissions to use AWS SES.
- Follow the on-screen instructions to complete the role creation. You"ll be asked to name the role and add tags if needed.
Step 2: Create Access Keys
After creating the IAM role, obtain the Access Key ID and Secret Access Key associated with that role. These keys will be used to authenticate CodelessAPI's interactions with AWS SES. You can follow this tutorial to create and retrieve the Access Keys. Make sure you save these for later.
- Log in to your AWS Management Console.
- Navigate to the Identity and Access Management (IAM) console.
- Choose "Roles" from the left sidebar.
- Search for the role you created earlier (the one for CodelessAPI) and click on it.
- In the role details, navigate to the "Security credentials" tab.
- Click "Create access key" to generate new Access Keys.
- Once generated, you"ll see the Access Key ID and Secret Access Key. Make sure to copy both and save them in a secure location. You"ll need these keys to configure the AWS SES module in CodelessAPI.
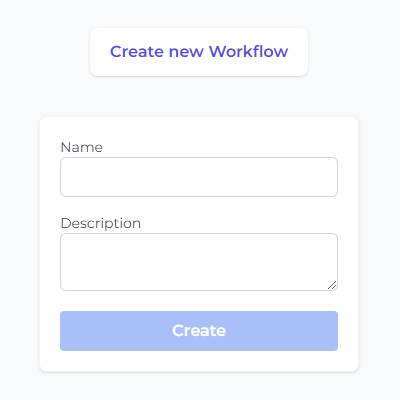
Step 3: Create a new Workflow
- Log in to your CodelessAPI.io account and click on the "+ Create new Workflow" button in the Workflow section of your dasboard.
- Provide a name and description for your Workflow. Click on "Create" and you will be redirected to the Workflow builder page.
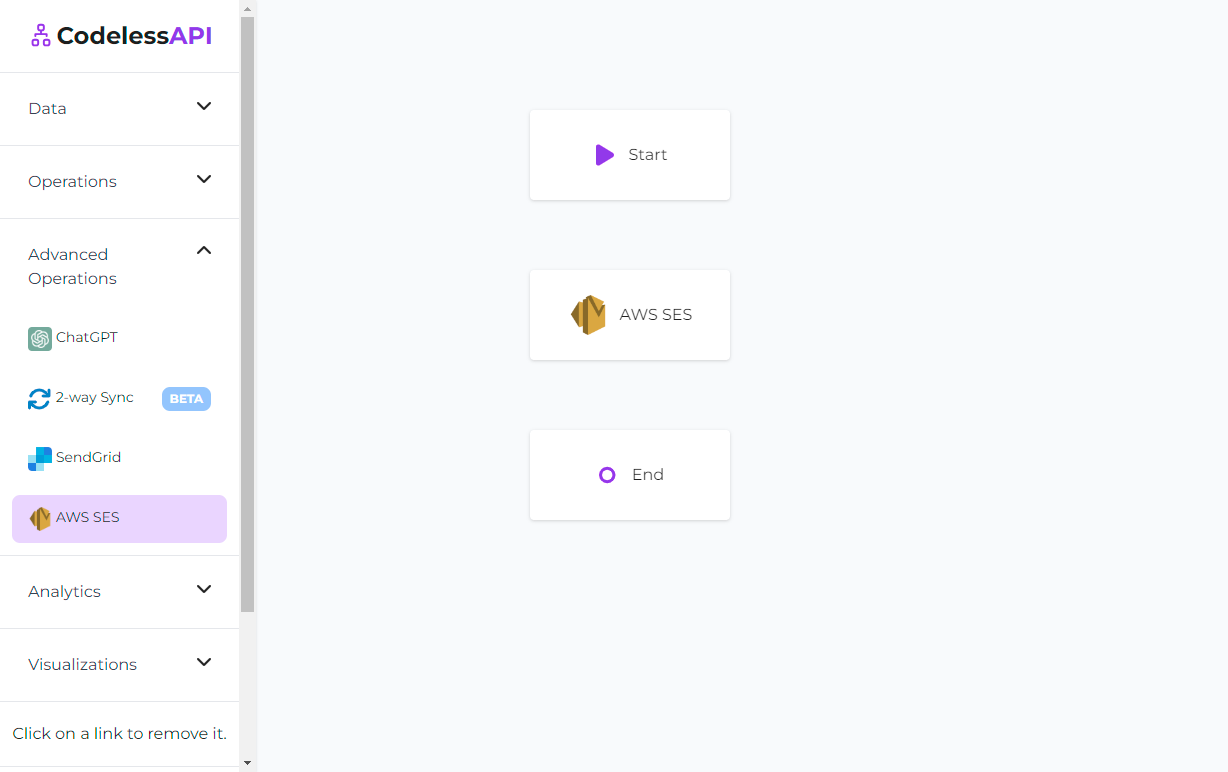
Step 4: Adding the AWS SES Module
- On the left sidebar, find the "Advanced Operations" section and expand it. Select the "AWS SES" option and drag it onto the canvas.
- You'll now see the AWS SES module on your canvas. Let's configure it to connect to your AWS SES account securely.
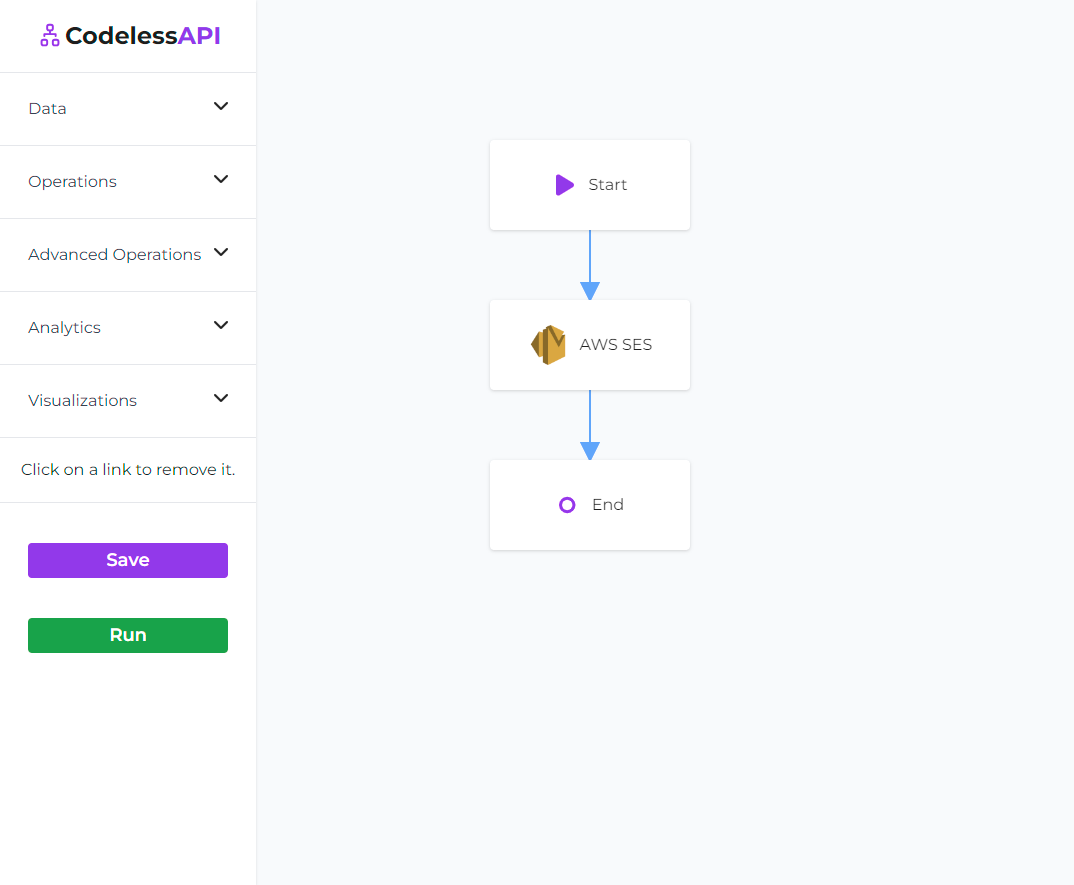
Step 5: Linking the Modules
- Click on the Start module, and then click "Link". Next, click on the AWS SES module. You'll see a line going from the Start module to the AWS SES module, with the arrow pointed to the AWS SES module.
- Repeat the process for the AWS SES module to the End module. Your canvas will now look like this:
Step 6: Configure AWS SES
To send emails using AWS SES, you need to provide your Access Key ID and Secret Access Key that you generated from step 2 as well as the region from step 1.
- Click on the AWS SES module on the canvas, and then select "Configure" from the options.
- In the configuration panel, click on "New AWS SES Account" and paste your Access Key ID and Secret Access Key and add your AWS SES region. Provide a name and description for the account.
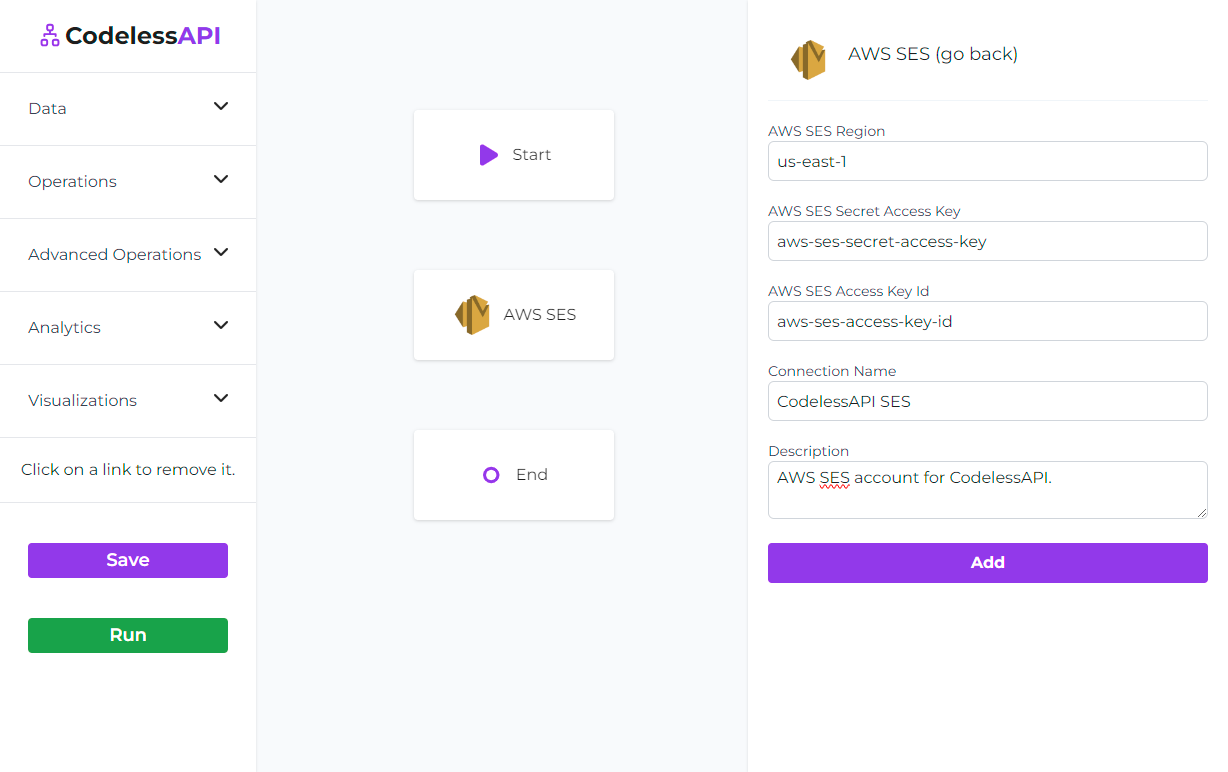
- You'll now be able to configure the email configuration by clicking on your newly created AWS SES account and then filling out the columns.

- The "From email" options are the emails your AWS acccount will send from. Please ensure these are verified in your AWS account. You can either verify individual email addresses, i.e. "hello@codelessapi.io", or verify domain identities, i.e. "codelessapi.io". Verifying individual identities will only let you send emails from that specific email. Domain identities let you send emails from any email that ends with your domain. Please follow this tutorial for more details on how to verify email addresses and identities.
All of the columns can either be set with the "manual" option or the "map" option. The manual option let's you hardcode the entry.
The map option is useful for automating and sending mass emails. You can connect a data source to your AWS SES module and then select a field from your data source. I.e. if you have a leads list in Notion with an "Email" column, you can connect a Notion module to your AWS SES module, select "map" for the fields you want populated from Notion, and then select the relevant field. This will automatically send a new email for every row in your Notion table. Please follow our other blog posts for more detailed integrations and customizations with AWS SES, including using ChatGPT to create personalized mass emails.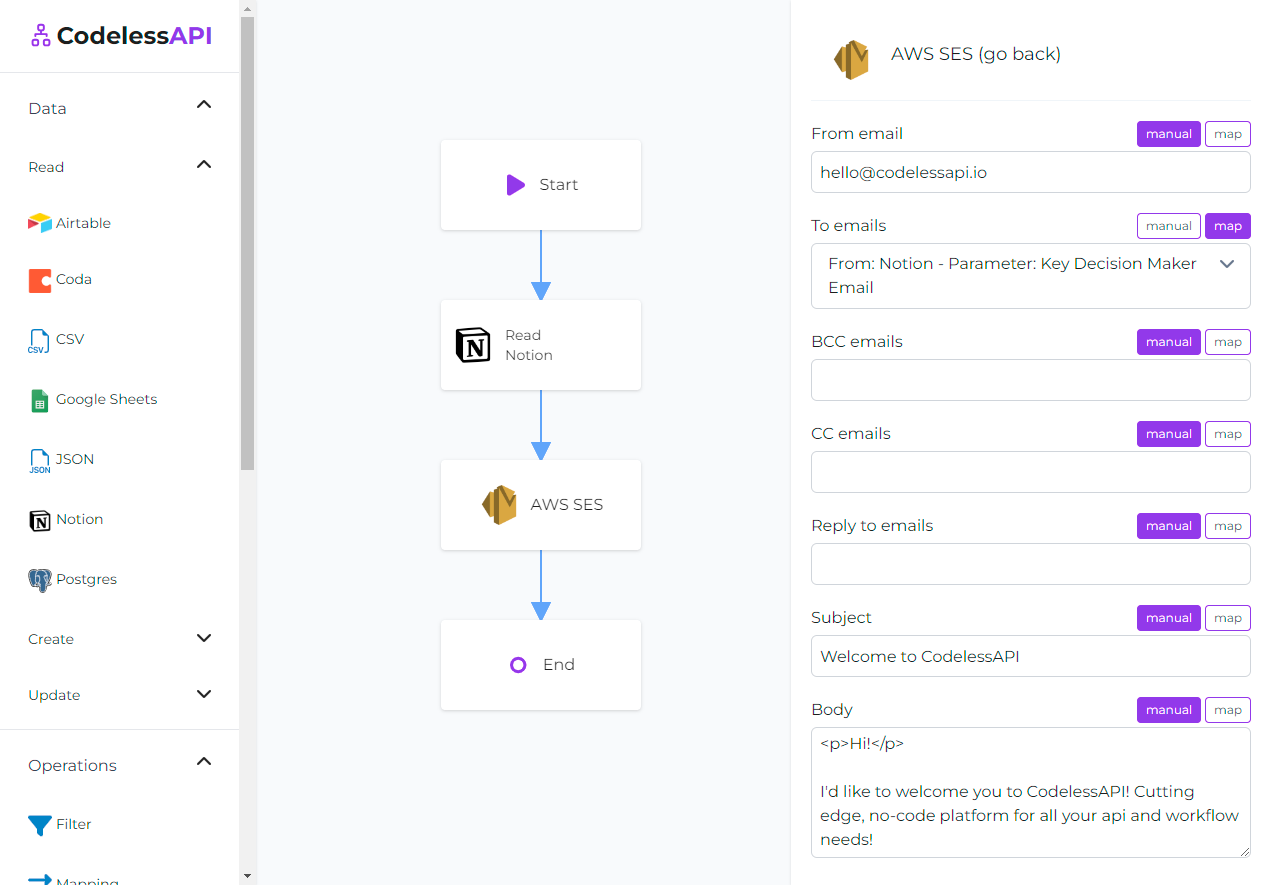
Step 7: Run the Workflow
Before finalizing your API, use CodelessAPI.io's built-in run feature to validate your API endpoint and ensure that the emails are being sent correctly. Click the "Run" button at the bottom of the left side panel to test your workflow.
Once you are satisfied with the results, you can either run your Workflow manually or copy the API associated with your Workflow and have it triggered based on an event. You can find your Workflow API by clicking on the "Start" module and then selecting the "Configuration" option. Copy the API link provided.
Conclusion
You've successfully connected AWS SES to CodelessAPI and automated email sending. This powerful combination, along with source modules, allows you to send personalized emails at scale without writing complex code.
Start leveraging this integration to enhance your product's communication with users. If you encounter any challenges or have questions, feel free to reach out to us at hello@codelessapi.io. We're here to assist you in optimizing your email workflows.
Empower your product with automated, personalized emails. Happy emailing!